Perma Dry Waterproofing Blog
Do you have water in your basement or crawl space? Is there mold or mildew affecting the air quality in your home? It's likely you need basement or crawl space drainage. Perma Dry offers a wide variety of common sense solutions to your wet basement or crawl space problems. Learn more here in our blog. When you're ready, give us a call and schedule an appointment.
Call for Inquiry
Send An Email
Get A Free Quote
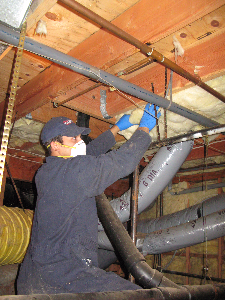
How to Explain the Benefits of Crawl Space Ventilation to Homeowners
As you remodel homes in Washington, don’t neglect the crawl spaces of those homes. Trouble-free crawl spaces allow homeowners to relax and enjoy their homes rather than worrying about radon, termites, or mold. When you hire a crew to ventilate the crawl space in a remodel, it’s a major selling point for people who want to know that every system and part of the home is under control.
Buyers and homeowners may need you to explain why adequate ventilation if necessary for their crawl spaces. Remember, when they understand the benefits of having the right cross-ventilation between their homes and the earth, your handiwork in their homes lasts much longer, because their homes will be less susceptible to rot, insect damage, and air-quality issues.
Use the following information as a guide to help explain crawl space integrity to people who want to make sure their home stays in great condition.
The Crawl Space Affects the Foundation
A home is only as sturdy as the foundation on which it rests. If support members like posts, joists, fasteners, and brick are exposed to mold, termites, and moisture, those support members may rot and fail. Floors may cave or sink, and wooden beams may break. Even some types of cement block will begin to break down under repeated flood conditions.
Unless the crawl space is inspected on a regular basis, these disastrous results may go unnoticed until it’s too late. Having a crawl space expert examine the space and make repairs is a key to the long-term stability of the home for those who are aging in place. Ventilating and improving the crawl space before a remodel is a wise idea to ensure that the foundation of the home is solid and protected.
A Crawl Space Exam Finds the Moisture
Most moisture found in Washington crawl spaces is due to what’s called bulk water. This is improperly channeled water from storms or other runoff. There may be irrigation that’s directed the wrong way, a high water table, or snowmelt that takes the path of least resistance into the crawl space.
A crawl space expert knows how to drain that water away from the home. When they also take steps to ventilate the crawl space to remove any water vapor from inside or outside of the home, there is additional dampness protection provided for the foundation of the home. Drainage and ventilation installed the correct way ensures that the residents get to enjoy their homes with less maintenance and worry in the future.
Ventilated Crawl Spaces Reduce Radon Risks
While King County and surrounding areas generally have low risks of radon in the underlying soil, residents of all Washington counties must still do all they can to protect themselves from the risk of radon exposure.
Older residents and people with suppressed immune systems should be especially on guard, since they may be more vulnerable to the effects of radon and other gases that accumulate in crawl spaces. All homes should be tested for the presence of this odorless, tasteless, invisible gas, and you, as a contractor, are a trusted advisor who should strongly encourage testing at all homes you service.
A proper vapor barrier over the ground in the crawl space is one way to reduce radon exposure. The plastic or other ground-covering barrier must be overlapped at least six inches at the joints and extend to the edges of the foundation. This requirement is waived if there is at least two inches of concrete slab installed over the floor of the crawl space.
Open and free-flowing cross ventilation reduces levels of radon in the crawl space. The ideal placement of vents depends on the location and style of the home’s foundation. In some older homes, new vents may need to be placed where there is a need for more airflow. Older vents may need repair, cleaning, or replacement.
Future Repair Crews Appreciate Fresh Air
If plumbing, wiring, or other infrastructure is located in the crawl space, future repair crews appreciate knowing they’re in safe, well-ventilated surroundings as they work. Plumbers, cable installers, and electricians must sometimes shimmy into tight spots in crawl spaces. This work proves dangerous or unhealthy when there’s mold or gas accumulating in the crawl spaces.
Ensure that proper crawl-space ventilation is taken seriously by the homeowners. By improving the crawl space now, you help make repair professionals’ jobs in the future safer and easier. You also make it easier for residents to hire workers and avoid potential liability for unsafe working conditions.
Perma-Dry Waterproofing & Drainage, Inc. has all of the evaluation and diagnostic equipment necessary to inspect crawl spaces and drainage systems. We have the experience and tools necessary to do repairs, restorations, insulation, waterproofing, and ventilation of crawl spaces and basements in any home you’re remodeling. Contact our team today to set up our crawl-space ventilation services for those who want to keep their homes in great condition.
7 Steps to Prevent Lawn and Driveway-Related Water Damage
 Due to the amount of rain we get in Seattle, homeowners are understandably concerned about preventing water damage to their homes. Water can easily sneak through openings in the foundation and crawl spaces, leaving water stains, mold, and damaged walls and floors behind.
There are two main places where this water enters: your driveway and your yard. Water can destroy both of these areas. It can also seep through from these areas to damage the structure of your home.
You can prevent water from destroying your driveway and yard—and your home—by following these tips.
1. Request Driveway Repairs
When they installed your driveway, construction workers should have added sealcoating to the asphalt surface. This coating protects water from seeping through and eroding your driveway. If your driveway has cracks, potholes, or other types of damage, you may need new sealcoating.
Before applying new sealcoating, though, professionals should repair the cracks and potholes. Otherwise, water can continue to cause damage to your driveway.
2. Adjust the Slope
Do your driveway and lawn slope toward your home? If so, water probably runs down them towards your home. You may want to consider getting your landscaping rebuilt to promote better drainage. Landscaping professionals can rebuild the driveway and yard so it slopes away from your home. To prevent standing water, they can fill in various depressions in your lawn with topsoil.
3. Improve the Soil
The type of soil you use can also affect your yard’s drainage. You might see drainage trouble if your soil is too shallow, compacted, or high in clay. Ask landscaping professionals about how to best improve the soil quality in your yard. If the soil is too compacted, try aerating your lawn twice a year. Aerating creates holes in the soil so water can soak in. Adding mulch will also help you loosen the clay in your soil.
4. Avoid Over-Watering
Watering your lawn may be crucial to its survival. But if you water for so long that the water starts to run down your driveway and into your street, you’re watering too much. Not only is this unnecessary, but it can also cause drainage problems that lead to water damage.
Experts recommend that you water your lawn no more than two or three times a week. This promotes a stronger root system in your lawn. You can check whether you’re giving your lawn enough water by pushing a screwdriver into your lawn. If you can’t push it in, you’re not watering enough. You can make sure you only water your lawn a little by setting your hose or sprinkler on a timer.
5. Wash the Car Elsewhere
If you wash your car in the driveway, notice which way the water flows. If water is flowing toward your home, it’s best to avoid washing your car in the driveway. Washing your car in the driveway is a bad idea for other reasons as well. No matter which way the water flows, chemicals in the soap can flow into storm drains, harming fish and other wildlife.
It’s best to wash your car on grass or gravel instead. Or, use a commercial car wash that recycles the water.
6. Inspect Gutters and Downspouts
After you’ve addressed the slope of your driveway, look closely at your gutters and downspouts. Watch what happens after it rains. Does the water flow out of the downspouts, down your driveway, and away from your home? Or does it stop near your home or driveway or even flow toward your home? Your gutters should carry water at least 10 feet from your home, or better yet, they should connect the water directly to the municipal storm water system.
If your gutters and downspouts are not properly configured, water could get trapped near your home. This water can cause serious water damage to your home’s foundation and walls. Have a roofing professional repair or reconfigure your gutters and downspouts to prevent water damage to your home. Remember that you should clean your gutters every year to prevent damage.
7. Install a Drainage System
The most important of all these steps is to install a new drainage system in your driveway— if you already have an old system, it could be rusted, broken, or clogged, which makes it useless.
Try removing the debris and cleaning it, but if that doesn’t do the trick, call for help.
Professionals will install a long strip drain, also called a trench drain, at the top of your driveway. Alternatively, French drains installed in your driveway or your yard can remove water during rainy seasons when the ground is oversaturated. Water will enter your drain, where it should move to a lower point away from your home. Ask about a catch basin as well. A catch basin can trap debris so it doesn’t back up the drains or enter the local water source.
If the slope of your driveway does not allow water to move away from your home, you may need to redo your landscape. A professional can make your driveway and yard slope away from your house, helping the water drain. Alternatively, you may require a sump pump. A sump pump is a device that manually removes water and directs it away from your home.
Another way to deal with the problem is a yard drainage system. Professionals dig a trench and install a drainage pipe below the soil. They also place rock near the pipe, which allows water to flow freely. Yet another solution is a footing drain. These drains are placed near your home’s foundation to re-route water from the crawl space, foundation wall, or basement. You can also have drainage systems installed in your basement or crawl space to direct water away from these areas.
Don’t let your yard and driveway sustain water damage. To learn about specific drainage solutions that can protect your home, talk to the waterproofing specialists at Perma-Dry Waterproofing & Drainage, Inc.
What to Do When Your Basement Leaks
A leaky basement is no laughing matter. Water can contribute to mold growth after just two days, which means you need to dry out the house and get rid of moldy items as soon as possible. Follow these tips to restore your basement to its original condition.
Put safety first.
Before you trek down to your basement to find out where the water is coming from, put on a pair of rubber boots. They will not only prevent your feet from getting wet with possibly dirty or even sewage laden water, they will also protect you from electric shock. Do not try to touch electrical wires, devices, or outlets that may be wet.
Remove wet items.
Carpet and wood flooring, need to be removed.
1. Peel back carpets and remove the pad underneath by cutting it in to pieces and hauling out of the basement. Carpet pads hold most of the water, and in order to salvage the carpet itself and prevent mold or mildew growth, the carpet needs to dry out. Place something under the carpet (paint cans, chairs) anything to raise it up off the floow and start blowing COLD air under and around the carpet. DO NOT USE HEAT! Hot air and water make MOLD!
2. If the issue is severe enough use a dehumidifier to help remove the moisture form the air. If the flooding is severe enough, a professional water removal company should be called in to get the job done. But taking these extra steps will ensure you salve as much as possible while you wait for their response.
3. Sheet rock and finished walls should be cut, opened, and removed for proper air flow. If you get to the water fast enough and remove the carpet from direct contact with the walls, you may be able to dry it out in time before mold begins to grow. But in order to get maximum ventilation and air flow behind walls, sheet rock should be removed 2′ feet up from the floor. This is not a requirement, just a recommendation if the water has sat for more than 48 hours.
4. Take remaining furniture, important papers, or items of sentimental value out of your basement and to a dryer area in the house. Even moisture in the air (or dehumidification of the space) can damage personal items, papers and photos.
Drain the excess water.
If you have access to a wet-dry vacuum, plug it in to a dry electrical outlet to suck out the standing water. If you don’t, call a professional disaster cleanup crew. They have the proper equipment to remove the water and dry any wet surfaces so the basement doesn’t develop mold.
Find the cause of the leak.
A basement leak may come from a variety of sources. Check your water main pipe, water heater, and boiler valves to see if they are leaking. If they are, you should call a plumber to stop the leak.
If water is in multiple areas, then there is likely a lot of water under the slab of the basement and a draiange proffesional should be called. IF there is water in one main area, or this has happened in the same area repeatedly, then there could be a crack or . If the Check below grade windows to see if water is seeping through the walls. Sometimes a downspout dumps water close to your foundation and it enters the basement. Arrange the downspout so it drains well away from your house.
Sometimes water enters through gaps or cracks in windows. Seal your windows with professional grade caulking. If water is entering through a window well, invest in a clear plastic well cover to keep water from filling it up.
Check your walls for cracks and holes. You can use plaster, cement, or caulking to seal any openings in the basement walls.
Call a professional waterproofer.
If you can’t determine the source of the leak, or the leak continues despite your efforts, it’s time to call in the professionals. Waterproofing surfaces seals your basement so no water enters. They can also install an interior drain and sump pump system that drains excess water during an emergency.
If you find yourself in a leaky basement emergency, don’t hesitate to call the experts at Perma Dry Waterproofing. Call toll-free at 1-800-584-9118 today.
Combating Potential Seattle Home Hazards
If you’ve lived in Seattle for any amount of time, you’re probably familiar with getting a little wet. Whether you’ve frequented the dripping streets or own a home on the waterfront, water is no stranger to you.
After all, Seattle receives an average annual precipitation of over 36 inches per year. This rainfall contributes to many important water sources. One of these includes ground water, the source of well water for many Seattle area residents.
Additionally, high ground water yields high water tables and a moist environment. Seattle’s proximity to the sea also allows for increased humidity levels.
What does all this mean for you? If you own home in the Seattle area, it may be vulnerable to water damage. As a result, you’ll need to take steps to protect your home from condensation, leaks, flooding, humidity, and mold.
Potential Home Hazards
Where there’s moisture, there’s usually mold and mildew. Mold and mildew can work their way into the cracks of your home and eat away at the wood and other materials. Mold and mildew result from a variety of conditions. Some of these include:
- Flooding
- Messy and unkempt crawl spaces
- Poor air circulation and condensation
- Unchecked leaks
- Wet or humid indoor air
Additionally, your home’s exterior can affect how much moisture and mold build up in your home’s interior. Keep an eye out for the following issues:
- Downhill or uneven home placement
- Poor yard or gutter drainage
- Rising sea levels for waterfront homes
- Sump pump and other irrigation problems
- Well deterioration or leakage
Sometimes multiple issues can arise at the same time, making it difficult to identify the true cause behind leaks, floods, and mold. So how can you combat such potential home hazards?
Use the following information to guide you, so you can seek professional help as needed.
Ways to Minimize and Prevent Water Damage
Mold and water damage are often difficult to spot at a glance. They like to live in the darker, damper corners of your home, where you’re not likely to look for them.
To prevent water damage, regularly inspect your home for leaks, humidity, and condensation. The most likely places for water buildup include the basement, exposed pipes, bathroom walls and floors, etc. But you’ll want to be thorough—leave no corner or cabinet unseen.
Be On the Lookout for These Telltale Signs
As you investigate various parts of your home, be on the lookout for telltale signs of water damage and moisture buildup:
- Bubbling walls or flooring
- Cracked walls
- Discoloration
- Loose pipe connections
- Mildew
- Rusted or corroded pipes
- Slow or clogged drains
If you spot any of these signs in your home, it’s time to call in the professionals. Plumbers can repair leaking pipes, rusted plumbing, and many other issues in your home, so they’re often the first people you should call.
However, if your plumber continually fixes the same areas, you may need to dig a little deeper to find the reason for the water buildup. Your home’s crawl space is a good place to start.
Crawl Space Considerations
Crawl spaces are notorious contributors to and hosts of mold, pests, and condensation buildup. Any one of these problems create an unhealthy environment in your crawl space. And because crawl spaces are out of sight, their condition usually remains out of mind.
But you shouldn’t ever ignore the state of your home’s crawl space. Over 40% of your air supply comes from this area. This means that the mold or other contaminants hiding beneath your home can put your family at risk of allergies and other respiratory conditions.
The best way to minimize this risk is by preventing it in the first place. One way you can keep your crawl space free of moisture and rot is through a crawl space encapsulation, or sealed crawl space. This involves installing a concrete or plastic covering to seal any gaps.
Your crawl space coverings shouldn’t just be run-of-the-mill, though. It’s essential to obtain a reliable reinforced liner system to guarantee moisture prevention. While you’re at it, consider purchasing new or original vapor barriers to provide additional protection.
Also, have a professional waterproofing provider to check the state of your crawl space insulation. Ask him or her if your home has adequate drainage systems installed. This will help maintain the appropriate crawl space condition to keep your home and family safe and dry.
Safe Seattle Living
To optimize the protection of your home and family, stay informed on the latest water issues in your area. Read up on the recent precipitation averages, sea levels, and water table measurements.
Keeping track of all these factors will help protect and preserve the work you’ve put into waterproofing your home. And if you ever have a problem you don’t quite know how to diagnose or fix, contact your local waterproofing provider.
Get Rid of Basement Mold Once and For All
*Before you do anything please make sure that any leaking water that could be causing the mold is shut off.
Mold is a silent destroyer: it creeps in when you least expect it, slowly and surely breaking down dead materials and growing in fuzzy, colorful clusters.
Outdoors, mold plays a key role in decomposing organic matter. Indoors, mold can irritate eyes, trigger asthma attacks, and even lead to chronic illnesses.
Foundation Waterproofing Federal Way
When you see white, black, gray, or green mold in your basement, it can be tempting to panic and call in professionals with hazmat suits to remove it.
Don’t worry. Stay calm.
While mold can cause health problems in certain individuals, most mold is relatively harmless. Some estimate that we’re surrounded by tens of thousands of types of mold, and chances are likely that you’re breathing in mold spores right now.
Unfortunately, mold is unsightly, and it can cause additional damage to your home and basement if not dealt with properly. While you don’t need a hazmat team to remove your mold, it’s important to identify the cause of the mold and take steps to remove it yourself.
What Causes Basement Mold?
As mold grows, it releases microscopic spores that drift in the air. Because mold can be found almost everywhere, it’s likely that mold will find its way into your house no matter how often you clean it.
However, mold is attracted to moist, damp, and dark environments (such as your basement). Any of the following could encourage
mold growth:
- Condensation – Basements are often known for their humidity and cold temperatures. Together these create condensation which can collect on cold metal pipes, floors, and walls.
- Flooding – Basement flooding is one of the biggest causes of mold infestation. When a house floods, the water runs down to the basement, where it doesn’t dry as quickly as other rooms.
- Leaks – Basement leaks are sometimes hard to spot, as the leak often starts in a nearby room and eventually works its way to the basement. Additionally, cracks in the walls and flooring can also allow ground water to come into your home.
- Humidity – Even if water from a flood or leak has long since evaporated, the water in the air can create the perfect environment for mold.
You can minimize these growth factors by keeping your basement well lit, ventilated, and insulated.
How to Spot Basement Mold
The easiest way to tell if your basement has mold is the smell. Mold has a musty, earthy smell. In many cases, you can smell the mold long before you can spot it.
If your basement smells musty, it’s a good idea to check for mold because it grows just about anywhere. The most common places to check include the following:
- Wall cavities
- Wooden building frames
- Insulation
- Storage boxes
- Furniture
- Pipes
- Ducts and vents
Additional indications of mold include floor warping and ceiling or wall discoloration.
Steps to Remove Basement Mold
If you’ve spotted mold in your basement, it’s best to take immediate steps to prevent additional damage to your home. Multiple DIY techniques are available to eliminate mold quickly and safely.
Fight Mold with Bleach
If your basement is flooded, it’s best to dry the room thoroughly and then sanitize with bleach. Bleach reduces mold count while neutralizing harmful bacteria at the same time. Most experts recommend mixing about 1 cup of chlorine bleach with 1 gallon of water. Scrub the affected area thoroughly. If your mixture becomes dirty, flush the remainder and create a new mix.
Remove Mold with Borax
Borax is a powerful cleaning agent that kills mold and inhibits mold growth. As it dries it leaves behind a powdery residue that repels mold. Unlike bleach, it is chemical free and does not emit dangerous gases. You can use a borax-based cleaner or mix 1 cup borax with 1 gallon of hot water. Make sure the borax is fully dissolved, and apply the solution to the moldy area. Let it sit for a few minutes and then use a scrubbing brush or cloth to wipe the mold away.
Fall Back on Detergent and Water
If you don’t have bleach or borax available, good old-fashioned detergent and water may do the trick. It doesn’t kill the mold entirely, but it can help remove mold on non-porous surfaces.
Remember: Safety First
Keep in mind that as you use these techniques, you should also seal the area to prevent mold spores from traveling from room to room. The more you scrub, the more mold you disperse into the air. Be sure to wear safety goggles and cleaning gloves when removing mold.
Need Additional Help?
If none of these techniques work to remove the mold, then it may be time to call in the professionals.
Some companies specialize in mold removal and remediation, so they have trained technicians to remove even the most stubborn mold infestations. Additionally, local repair companies may be able to fix cracks and leaks that lead to mold. You may even consider purchasing a dehumidifying system to combat mold, mildew, and airborne spores.
Don’t let mold become a permanent guest in your home. With just a few simple steps, you can get rid of basement mold once and for all!
Where Should You Place Your Home’s Insulation?
You’ve been a homeowner for a few years now. The initial excitement you felt at having your own place has faded, and now you’ve settled in to the benefits and frustrations that come along with property ownership.
By now you’ve realized that you’re responsible for a whole lot more than you imagined. If a major appliance breaks, you have to decide whether to repair or replace it (no more calls to the landlord). You start paying attention to your energy bill more closely than before.
Sump Pump Installation Everett
And you start to wonder if your home is adequately insulated.
But do you know where your insulation should go? That’s all hidden away in unfamiliar areas of the house, like the crawl space or attic.
Clearly, it’s time to educate yourself on effective home insulation. A good place to begin is at the foundation; then you can make your way up to the roof.
What Lies Beneath
Before you became a homeowner, you may not have spared a thought toward the foundational crawl space of a house. Although crawl spaces can be situated both at the bottom of the house and under the roof, it’s fairly common for a house to have a sub-floor crawl space.
This area occupies the space between the ground and the bottom of your home. Generally, if you have a sub-floor crawl space, you won’t have a basement. And-as the name implies-a crawl space isn’t tall enough for person to stand up inside it.
Some crawl spaces have floors made from concrete; others have dirt or gravel. You can access this space through your home, generally through a trap door. Some homes access the crawl space from outside.
One advantage of a crawl space is that it allows your house sit above damp areas. That’s helpful if you live in a humid climate. Additionally, crawl spaces are cheaper to build than basements. It’s likely that most of your air ducts and plumbing pipes are here as well, making them easy to access.
It’s also an important location for insulation. Here’s why:
- Proper insulation keeps moisture at bay.
- Insulation can also repel pests.
- Insulation can also repel pests.
- The right depth and placement keeps your home more energy efficient.
So just what is the right placement?
When waterproofing and insulation installers look around the crawlspace, they’ll take note of vents, pipes, and ducts. All these areas require insulation. Another obvious location is the floor above, just between floor joists. It’s a good idea to use both insulation and moisture barriers to protect your home from mold.
Some installers prefer to insulate the foundational walls instead of the subfloor. In this way, they also protect sensitive pipes without needing to install much further insulation around the pipes themselves. However, it’s important to take care against invading moisture or pests from the outside.
Ask your installer about insulation that allows an airtight fit. This is the best protection from outside forces.
Vertical Spaces
Next, it’s important to assess your walls. The best time to do this, of course, is if you’re doing some other kind of renovation project where one wall is open to the studs. If you suspect your wall insulation is inadequate but you don’t want to dig into them to find out, ask your installer about blow-in insulation.
Blow-in insulation packs in insulation without a lot of fuss or cutting into walls. It works by injecting foam insulation into smaller holes that can be plastered over later.
If you have a basement instead of a crawl space, keep those walls well insulated. Your installer can recommend the best method.
On the Level
Do you have an un-insulated garage with a room just above it? If so, that room probably has a cold floor in the winter and a hot floor each summer. Look into better insulation.
First, it’s important to seal around vents and other places where air might rise into the room. Not only does this protect those in the
room from exhaust smells and other solvents or garage supplies, it creates an impermeable barrier so the floor insulation works more efficiently.
Think about your ceilings too, particularly if your home has an elevated (cathedral) ceiling. By insulating these level surfaces, you regulate temperature near the ceiling so it’s not much different from the ambient room temperature.
Lofty Thoughts
Last of all, take a look at your attic. This area has a lot of potential for energy loss. It’s relatively simple and inexpensive to install loose-fill insulation, which covers all areas well.
Before you order more, though, be certain the roof vents and fans operate properly. Create an airtight seal around them; then your insulation will work better.
Now that you know your home from bottom to top, you’ll be better prepared before your waterproofing and insulation specialist visits. Get ready to enjoy your newly insulated home, and stay comfortable in any condition!
Prepare Your Basement for Winter
The last thing you want to deal with during the busy winter season is your basement flooding. The increase of ice and cold can create leaks or cracks allowing moisture into your basement. If water enters your basement, you could face mold, mildew, or damage to stored items.
To avoid this, it’s important to prepare beforehand. Follow these small tips now so you can enjoy the holidays and keep your family safe. Here is how to prepare your basement for winter:
Look for Water around Basement Windows
Windows are a source for moisture to enter your home. After it rains, take a walk around the house to look for water near basement windows. Look for low spots in your lawn or pools of water around your basement window wells. Additionally, look for water running from the window. Any pools of water may cause problems if you have cracks in your foundation.
To avoid problems, look into replacing window wells. For an affordable, temporary fix you can purchase bubble window treatments.
Double-check Your Sump Pump
Take a moment to look for pooling water around your sump pump hose. This might include dips in your basement floor that could cause water to collect. During the coldest part of the winter months, any sitting water can freeze and cause your sump pump to stop working. As a matter of fact, your discharge pump lines should be safe from any freezing water to safely pump water away from your foundation. In severe cases, frozen water may cause permanent damage to your sump pump.
Water should flow away from the pump without any complications. If you do encounter pooling water, call professionals to come repair the area.
Seal Cracks
Cracks on the exterior of your basement may allow water into your basement. This means during large storms of rain or snow, water may seep into cracks. During cold months, freezing water expands, causing the water in cracks to widen and/or allow moisture into your basement. This could cause mold, which contaminates your basement’s ventilation and air quality.
To protect your basement, look for cracks in your foundation before the winter months. If you have experience filling cracks, you can use silicone or hydraulic cement to fill cracks smaller than two millimeters. If you haven’t filled foundation cracks before, please call a professional. Further damage can come from inexperienced people trying a do-it-yourself job.
Shovel Snow away from Your Home
After a snowfall or freezing rain storm, clear snow and ice as soon as possible. This will help you avoid ice accumulating near your foundation. You do not want water to freeze and melt near your foundation. Water that leaks into your basement foundation cracks may widen the cracks and cause further damage.
Additionally, as you shovel snow or chisel ice, push the it away from your home. You want to avoid piling snow or ice against your foundation. Doing so will help keep moisture away from your basement.
Remove Debris from Gutters
Before winter weather comes, clear gutters and roof drains of leaves or other debris. Any object that blocks water in these areas may cause water to overflow into the soil surrounding your home. The water in your soil may leak into your basement foundation.
Look for fall leaves left in your rain gutters or roof drains that may create barriers for running water. Additionally, trees on your property may cause fall leaves to accumulate in drains and gutters. Likewise, if you have evergreen trees, they may leave pine needles around your area that also clog these areas.
As a rule of thumb, water should drain at least five feet from your home’s foundation.
Prepare Pipes for Winter Freeze
Frozen water expands and puts pressure on pipes. This means if water freezes in your pipes, the water expands and may cause or widen cracks. Even minor cracks can create major flooding problems. For example, a small crack in a household pipe can leak 250 gallons of water a day. That much water can cause a major flood.
To protect your pipes from freezing you need to keep cold air from accessing them. Here are a few ways to do that:
- Wrap pipes with heat tape or cables.
- Insulate your basement.
- Drip warm water from the faucet overnight.
- In bathrooms, leave cabinet doors open to allow heat near pipes.
Check Your Humidity Levels
If you find your basement has poor drainage or high humidity levels, you may want to look into waterproofing your basement. This will prevent water damage that may occur during the winter season.
You can check humidity levels with a humidistat. Make sure levels are lower than 50 percent, otherwise your basement is prone to mold growth or structural damage. If you have high humidity, you can waterproof your basement, or for a quick fix, use a dehumidifier.
Don’t hesitate to call a professional plumber or waterproofer for help. He or she can help if you experience any leaks or flooding in your basement. You may also want to ask expert advice to avoid flooding before the cold winter months. The more you do now to dehumidify your home the more you can enjoy the holidays.
Now that you know how to get your basement ready for the winter months, check out our other blogs for more basement tips and tricks.
Steps to Protect Your Home From Water Damage in Seattle
Just a few inches of water is enough to cause problems in your building, whether it’s your home or your company. Water damage will threaten building components and furnishings, not to mention the many problems it can cause for those living or working in the building. Thankfully, if you deal with the water damage promptly the damage can be greatly mitigated. When you need water damage restoration you can’t afford to wait. That’s why Almighty Plumber specializes in water damage restoration and offers fast, efficient, professional service to you at any time.
Water damage can be caused by toilet backups, sewer line leaks, sump pump or water heater problems, washing machines or dishwashers, and floods just to name a few. With all of these possible causes of water damage to your building you need to react fast. Protect your property by calling Almighty Plumbing, we’ll extract the water fast and get to work right away on restoring damage caused by water as much as possible.
Not only can water cause visually displeasing damage, but water gets stuck between building materials. Floors, carpets, and between walls. This unresolved and extracted water and moisture lingers in building materials causing the most damage to the structure and the people in the building This type of water moisture can cause fungi growth or help foster mold. That’s why its extremely important that your floors and other surfaces are properly dried to avoid long term problems with fungi, mold or other growth in hidden parts of the building.
Water restoration is more than just drying it up and cleaning up the mess, solving the problems from re-occurring is just as important. So when water comes from pipes, pumps or other plumbing related sources, the fast, courteous and professional service at Almighty Plumbing is your one stop shop to cure all your damage woes.
Want to learn more? Contact Almighty Plumbing today and we’ll be happy to answer your questions or come out and take a look at your water damage to see what we can do to best serve you.
Want to learn more? Contact Almighty Plumbing today about our restoration services. Have a water
issues? Our fast response time will get your business or home back operating in no time.
How to Protect Your Seattle Home from Water Damage
In Seattle, we’re not afraid of a little rain. But rain can bring an unwanted risk with it: water damage in your basement or crawl space. A particularly heavy rain can flood your basement, but even light water buildup can cause water damage.
People worry about flooding and water damage in many places, but since Seattle gets a lot of rain, we worry about it a little more here. Fortify your home against the rain by waterproofing your basement and crawl space-if you do, you’ll avoid a disaster like a wet or damaged basement.
Here’s what you should do.
Install a Basement Drainage System
Hopefully you already have some kind of basement drainage system in place. This might include a floor drain, which contractors install in many homes during construction. You may also have a French drain installed outside your home; French drains direct water away from your foundation.
But nothing protects your home against flooding better than a sump pump. Contractors know the importance of these devices, and they install sump pumps in many newly constructed homes whether they could flood or not.
If you do not have a sump pump, a professional can install one in a sump pit. When excessive water runoff goes into your basement, the water flows into the sump pit. The sump pump then pumps out the water and sends it through pipes that take it away from your home.
Sump pumps come in two categories: submersible and pedestal. Submersible pumps have a waterproof covering and sit directly in a sump pit. On the other hand, pedestal pumps sit on a pedestal outside the pit. Pedestal pumps typically cost more.
When you look for sump pump installation, consider added features that could better protect your basement. You might consider a sump pump with emergency battery backup in case the main system becomes overwhelmed, or you could consider one with an alarm that will alert you about high water.
Install a Wall Moisture Barrier
Water can damage your basement in other ways in addition to flooding. Did you know that moisture can flow through your concrete wall to the inside of your basement or crawl space wall to the inside of your basement or crawl space?
A professional can install a moisture barrier between the foundation wall and the other layers. This blocks moisture from leaking in through cracks or pockets and prevents mold growth.
You should also seal any places in your wall that could allow water vapor to sneak in.
If you want to build or remodel a basement, speak to a professional about protecting your walls from water damage.
Dehumidify Your Basement
Another water damage problem in your home comes from a lack of ventilation. When air doesn’t travel out of your basement, excess moisture leads to mold and dampness. Purchasing a ventilation and dehumidifier system can improve the air quality in your basement and prevent water damage.
Install a Crawl Space Drainage System
If you have a crawl space, you know you’ll probably see the most water damage there. This happens because water in the soil outside your home can leak into the crawl space through the walls and floor.
How do you drain this unwanted water? The same way you get rid of basement water. Professionals can install a sump pump, add vapor barriers, and even install new concrete and insulation to seal all open spaces and prevent moisture damage.
Take Care of Outside Problems
If you have an effective drainage system and still experience water damage, the problem might lie in other areas in your house.
A waterproofing professional can help you determine and repair the source of the water damage, which may include:
- Foundation drains: You can find these drains outside basement footings. Your homebuilders should have installed these drains during construction. But if you have them and they don’t work, the contractors may have installed them incorrectly.
- Downspouts: Make sure they direct water 10 feet or more from the foundation; you can extend them if needed.
- Driveway trench drains: These drains keep storm water away from your home and driveway; check to make sure that debris hasn’t clogged them.
- Catch basins: These basins collect rainwater and send it to local waterways. Check to make sure the ones in your neighborhood function properly.
- Yard drainage: If you install an in-ground drainage system, you could prevent water buildup in your yard.
- Drain pipes: If you have clogged pipes, a professional can use of special pipe nozzles to remove dirt and minerals. They can also cut away tree roots blocking your pipes’ flow.
Say Goodbye to Water Damage
When you live in Seattle, you need to prepare for all kinds of water-related disasters. If you live in a newer home, the builder probably took steps to help you prevent water damage, but that doesn’t mean it can’t still occur.
Make sure you thoroughly examine your basement and crawl space for mold, peeling paint, and moisture-all signs that you have a water problem. If you have an issue with water damage, contact a waterproofing professional and take the necessary steps to prevent further damage. This could potentially help you save thousands of dollars in future repair costs.
Keep It Clean: 5 Things Every Homeowner Should Do To Keep Crawl Spaces Under Control
Leaks, dirt, dust, and mold all plague the infamous crawl space stereotype. In fact, the half basement terror even inspired a horror movie, but don’t let your crawl space turn into a place you avoid at all costs. A crawl space gives you a convenient place for storage. But if you want to use this area for storage, you won’t have much luck using a messy crawl space. Which means you first have to clean it up.
Take these essential steps to get a cleaner, functional crawl space:
1. Get Your Crawl Space Checked By A Professional.
Before you try and take a sledge hammer to your basement floor, consider calling a professional. Their experience and expertise can go a long way when it comes to home improvement. To get the best game plan for your basement, talk to someone who has dealt with basements before. Most of the time companies offer consultations for free.
Do this step as soon as possible. Whether you have a new home or one with decades of wear and tear, you could end up with a few problems if you ignore your crawl space. Health concerns from poor air quality can lead to mold illness. Damages to your foundation can also arise from a mistreated crawl space.
2. Dirt Be Gone!
If your crawl space still has a dirt floor, you might want to think of covering it. Not only can the dirt spread everywhere else in your house, but it retains moisture more than other materials. And if a flood strikes, it’ll turn your crawl space into mud and cause all kinds of problems.
The solution? Install a rat slab. A rat slab is a 2- or 3-inch slab of concrete that contractors spread over the entire basement floor. The rat slab gives your crawl space a clean flooring. Once you have a clean flooring to your crawl space, you can
start using it for storage, and let’s be honest, who doesn’t need more storage? It also prevents rodents and groundwater invasion.
If you want a quicker fix, a vapor barrier might work better for you. Barriers cost less, and they minimize the moisture in your basement to help keep the air quality clean. A vapor barrier is a piece of plastic that you lay down to stop the moisture in the air that causes mold and mildew. This solution can last for years and will help reduce problems with air quality.
3. Drainage System Delight or Disaster?
If you want to avoid mold, you have to install a drainage system. Water can get through floor foundations, walls, or through other drain pipes. When it does, mold and mildew start to grow and your crawl space starts to stink.
You have several options if you need to install a drainage system. Sump Pumps don’t cost too much, they give you a simple option if you don’t want to deal with the complication of a gravity flowing drain. Interior drainage systems take the water from inside of your house to the outside of your house. Builders dig a hole into the concrete from the drain to the outside of your house. They place a pipe in the hole, then they cover it back up with concrete.
4. Prevent Pests.
No one wants to go down into their crawl space and find that a bunch of creepy critters have invaded their space. Rats and mice gravitate toward any supply of shelter and food. Keep open food out of your crawl space if you want to avoid the pests. Store food in durable containers to reduce risk of unwanted pests.
If you have a lot of plants that provide cover outside, they will burrow there. If your foundation has any cracks, mice might follow roots and moisture through the cracks and into your crawl space.
Always fix foundational cracks as soon as possible to avoid this.
5. Prepare for Problems.
Now that you have a functioning crawl space, don’t to maintain it-the issues and invaders may return. Schedule a time every othermonth to do a problem scan. Complications like leaks or foundational damage can happen, and you want to catch them as soon as possible. If you forget your crawl space, you risk health problems for your family and foundational problems in your home.
Also, if make sure you check often, you can keep it tidy and avoid a hoarding situation. While you check, look for any type of water leakage, rat bites or droppings, and anything that looks out of the ordinary. Upkeep in a basement is just as important as upkeep in the rest of the house.
Now that you have the tools to keep your crawl space under control, you can get started! Take the suggestions one step at a time. Never overwhelm yourself or take on more projects than you can handle. Plan your work and work your plan.
Get in Touch
(206) 375-3240
Contact Us
Open Hours
7:30am - 5pm Weekdays
Closed Weekends
Our Office
608 SW 12th Street
Renton, WA 98057
Email Us
Email Us