Perma Dry Waterproofing Blog
Do you have water in your basement or crawl space? Is there mold or mildew affecting the air quality in your home? It's likely you need basement or crawl space drainage. Perma Dry offers a wide variety of common sense solutions to your wet basement or crawl space problems. Learn more here in our blog. When you're ready, give us a call and schedule an appointment.
Call for Inquiry
Send An Email
Get A Free Quote
Preventing Basement Water Damage During Heavy Rains
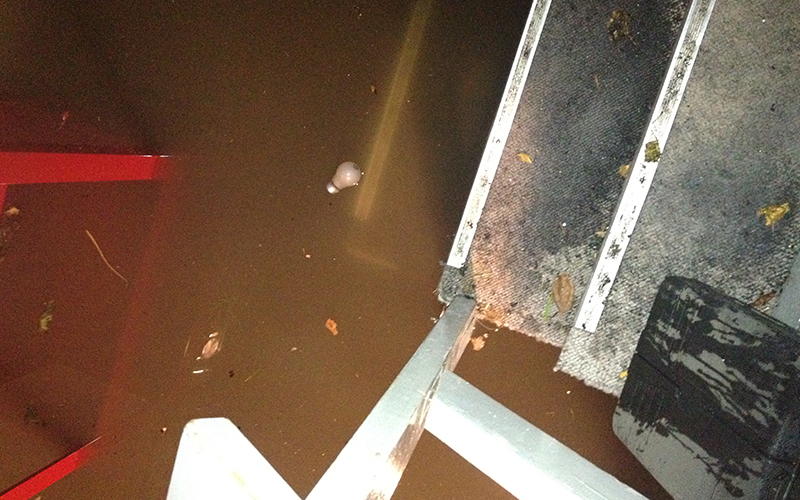
Heavy rains can cause serious damage to homes, particularly in areas where basements are common. Water damage in a basement can be costly to repair and can also create an unhealthy environment. Fortunately, there are a number of steps homeowners can take to protect their basements and prevent water damage when the rain falls.
Check Gutters and Downspouts
The first step in preventing basement water damage is to inspect the gutters and downspouts. Gutters should be free from clogs, debris, or other obstructions that can cause water to back up and enter the house. Downspouts should be extended away from the foundation of the house to ensure that water drains away from the foundation as far as possible. In addition, consider installing a gutter guard or other device that can help keep debris from clogging the gutter system.
Seal Cracks and Holes
Cracks and holes in the foundation of a home should be sealed to prevent water from entering the basement. This can be done by caulking the cracks and filling any larger holes with concrete. Additionally, any cracks or openings in the walls should be sealed with caulking as well. Doing this can help ensure that water does not enter the basement and cause water damage.
Keep the Basement Dry
In order to prevent water damage, it is important to keep the basement dry. This can be done by installing a dehumidifier and running it frequently. Additionally, it is important to check for any signs of water seepage, such as damp spots or watermarks on the walls. If any of these are present, it is important to address the issue as soon as possible in order to prevent further damage.
Install a Sump Pump
Installing a sump pump is a great way to protect a basement against water damage. A sump pump is installed in the basement and is designed to pump out any water that enters the basement. This can help ensure that any water that does enter the basement is quickly and effectively removed, preventing damage from occurring. Additionally, it is important to ensure that the sump pump is running properly to ensure that it is able to do its job.
Taking the steps listed above can help ensure that your basement stays safe and dry during heavy rains. Additionally, it is important to regularly inspect the basement for any signs of water damage and to address any issues as soon as possible. By taking these steps, homeowners can help protect their homes from water damage and keep their basements dry.
For those looking for more ways to protect their home from water damage, PermaDry Waterproofing offers a variety of waterproofing services. From foundation repairs to sump pump installations and more, they are experienced in helping homeowners protect their homes. Contact PermaDry Waterproofing today to learn more about how they can help protect your home.
Common Mistakes to Avoid in Basement Waterproofing and Foundation Repair
Basement waterproofing and foundation repair are two of the most important home maintenance steps that homeowners should take. It is not only necessary to keep the home structurally sound but also to ensure the safety of the family. Unfortunately, it is easy to make mistakes in these two areas that can cause significant damage and cost a lot of money to repair. To ensure that your basement or foundation repair is done properly, here are some common mistakes to avoid.
Not Doing Proper Research
One of the most common mistakes to avoid when dealing with basement waterproofing and foundation repair is not doing proper research. You should always carefully research all of your options before selecting a contractor to do the job. Make sure to look for reviews, ask for references, and look for any past issues that the contractor may have had. Additionally, you should also be sure to check the credentials of the contractor to make sure they are properly licensed and insured.
It is also important to research the materials and technology that will be used in the project. There are a variety of materials and technologies that can be used to waterproof a basement or repair a foundation. Make sure you are familiar with the options available and select the one that best suits your needs. Additionally, be sure to understand any warranties that may be available with the materials or technology being used.
Not Testing the Soil
Another common mistake to avoid is not testing the soil before starting any waterproofing or foundation repair project. It is important to understand the makeup of the soil so that you can select the appropriate materials and technologies. Not testing the soil can lead to the use of improper materials and technologies, which can lead to a costly and ineffective repair.
Soil testing should be done by a professional. It is important to understand the pH balance, the type of soil, the amount of water present, and any other relevant factors. By testing the soil, you can ensure that the best materials and technologies are used to complete the project.
Not Paying Attention to Drainage
Another common mistake to avoid in basement waterproofing and foundation repair is not paying attention to drainage. Poor drainage can lead to water damage in the basement and can also cause structural damage to the foundation. To prevent these issues, it is important to make sure that the drainage systems are properly installed and maintained.
Make sure to check for any drainage issues before beginning the project. Additionally, be sure to check for any leaks or blockages in the system. If any are found, make sure to repair or replace them before continuing with the project.
Not Utilizing Professional Services
Finally, it is important to avoid not utilizing professional services when dealing with basement waterproofing and foundation repair. While it may be tempting to try to do the project yourself, it is important to remember that these are complex projects that require the skills and knowledge of a professional. Attempting to do these projects yourself can lead to costly mistakes and repairs.
A professional contractor will have the experience and knowledge to properly complete the project. Additionally, they will have the necessary equipment to do the job right. By utilizing professional services, you can be sure that the job will be done correctly and efficiently.
Basement waterproofing and foundation repair are important home maintenance steps that should not be taken lightly. While there are many things to consider when undertaking these projects, avoiding these common mistakes can help ensure that the job is done correctly and efficiently. By doing your research, testing the soil, paying attention to drainage, and utilizing professional services, you can ensure that your basement and foundation are properly waterproofed and repaired.
The Benefits of Exterior Basement Waterproofing
The basement is a valuable asset in any home. Unfortunately, water damage is one of the most common and costly problems in basement areas. Basement waterproofing is an important step in protecting your home from water damage, and utilizing an exterior waterproofing system is one of the best ways to protect your home from water damage. In this article, we’ll discuss the benefits of exterior basement waterproofing, what it entails, and why it’s important.
What is Exterior Basement Waterproofing?
Exterior basement waterproofing is a technique used to prevent water from seeping into the basement of a building. This type of system is installed on the outside of the foundation walls, and it works to keep water out of the basement. The system consists of a waterproof material such as a membrane or a coat of sealant that is applied to the walls and a drainage system that collects water and redirects it away from the home.
Exterior basement waterproofing is a more comprehensive solution than interior waterproofing. Interior waterproofing works to redirect water away from the basement, but it does not prevent water from seeping into the basement. Exterior waterproofing, on the other hand, is designed to stop water from entering the basement in the first place.
The Benefits of Exterior Basement Waterproofing
Exterior basement waterproofing offers a number of benefits, including:
- Prevents water from entering the basement and causing damage
- Reduces the risk of mold growth in the basement
- Prevents dampness and musty odors
- Reduces the risk of foundation damage
The most important benefit of exterior basement waterproofing is that it prevents water from entering the basement and causing damage. Water can cause a number of problems in the basement, including mold growth, musty odors, and structural damage. Exterior basement waterproofing prevents these problems by keeping water out of the basement in the first place.
Exterior basement waterproofing also reduces the risk of mold growth in the basement. Mold growth is a common problem in damp basements, and it can be difficult to get rid of once it has taken hold. Exterior basement waterproofing prevents mold growth by keeping the basement dry.
Another benefit of exterior basement waterproofing is that it prevents dampness and musty odors. Damp basements are often plagued by musty odors, and this can be a problem for homeowners who want to use their basement for living or storage space. Exterior basement waterproofing keeps the basement dry, and this helps to prevent musty odors.
Finally, exterior basement waterproofing also reduces the risk of foundation damage. Water can seep into the foundation and cause cracks and other damage. Exterior basement waterproofing prevents this from happening by keeping water out of the basement.
Conclusion
Exterior basement waterproofing is an important step in protecting your home from water damage. By keeping water out of the basement, it helps to prevent a variety of problems, including mold growth, musty odors, and foundation damage. If you’re looking for a way to protect your home from water damage, consider investing in an exterior basement waterproofing system.
Get Professional Help With Exterior Basement Waterproofing
Exterior basement waterproofing is not a DIY task. It’s important to hire a professional to ensure that your system is installed correctly and that it will be effective in keeping water out of your basement. If you’re looking for a reliable and experienced exterior basement waterproofing professional, Permadry Waterproofing is here to help. We offer a range of services, including basement waterproofing, foundation repair, and more. Contact us today to learn more about how we can help you protect your home from water damage.
Foundation Repair: Do’s and Don’ts for Homeowners
Foundation repair is an important topic for homeowners to understand. When a home’s foundation is in trouble, the entire structure can be at risk. It’s important to know what to do, and more importantly, what not to do when it comes to foundation repair. The following is a guide to the do’s and don’ts of foundation repair for homeowners.
Do: Hire a Professional
One of the most important things you can do when it comes to foundation repair is to hire a professional. Foundation repair is a complex and potentially dangerous job, and it’s important to have an experienced professional handle it. Hiring a professional will ensure that the job is done correctly and safely, and that the repairs are done in a timely manner. Additionally, hiring a professional will give you peace of mind knowing that the job is being done correctly and according to local building codes.
When hiring a professional, it’s important to do your research. Ask around for recommendations and get several bids from different contractors. Make sure to ask about their experience and certifications, and always get references. Additionally, make sure to get a written estimate before any work is done.
Don’t: DIY
While it may be tempting to try and repair the foundation yourself, it is not recommended. Foundation repair is a complex and potentially dangerous job, and is best left to the professionals. Trying to do the repair yourself can lead to costly mistakes and further damage to the foundation. Additionally, DIY repairs may not be up to local building codes, and could potentially be a safety hazard.
It’s important to note that while some minor foundation repairs may be possible to do yourself, it’s best to leave the more complex repairs to the professionals. If you’re unsure of the extent of the repair, it’s best to call a professional for an assessment.
Do: Look for Warning Signs
One of the most important things you can do to protect your home is to be aware of the warning signs of foundation problems. Some of the most common warning signs include cracks in walls, sloping floors, sticking windows and doors, and water in the basement. If you notice any of these signs, it’s important to call a professional right away. The sooner you address the problem, the better chance you have of avoiding further damage and costly repairs.
It’s also important to note that some signs may not be visible to the naked eye. That’s why it’s important to have your home inspected regularly, especially if you live in an area with a high water table or areas of unstable soil.
Don’t: Ignore Warning Signs
It’s important not to ignore warning signs of foundation problems. Ignoring the signs can lead to further damage and costly repairs. Additionally, ignoring the signs can be a safety hazard. If you notice any warning signs, it’s important to call a professional right away.
It’s also important to note that some warning signs may not be visible to the naked eye. That’s why it’s important to have your home inspected regularly, especially if you live in an area with a high water table or areas of unstable soil.
Do: Address the Problem Quickly
Once you have identified a foundation problem, it’s important to address it quickly. The longer you wait to repair the foundation, the more damage it can do to the overall structure of the home. Additionally, the longer you wait, the more costly the repair can be. The sooner you address the problem, the better chance you have of avoiding further damage and costly repairs.
It’s also important to take preventative measures to avoid foundation problems. Some of the most effective preventative measures include:
- Keeping gutters and downspouts clear of debris
- Making sure soil is graded away from your foundation
- Making sure sprinklers are not spraying water against the foundation
- Making sure your home is not exposed to excessive moisture
Finally, it’s important to call a professional for a foundation repair assessment if you’re unsure of the extent of the repair needed. A professional will be able to assess the problem and provide you with the best solution for your home.
Don’t: Delay Repairs
It’s important not to delay repairs when it comes to foundation problems. Delaying repairs can lead to further damage and costly repairs. Additionally, delaying repairs can be a safety hazard. If you notice any warning signs, it’s important to call a professional right away.
When it comes to foundation repair, it’s important to do your research and hire a professional. It’s also important to keep an eye out for warning signs and address the problem quickly. Finally, it’s important not to delay repairs when it comes to foundation problems. By following these do’s and don’ts, you can help ensure that your home’s foundation is in good shape and that you are protected from further damage and costly repairs.
If you’re in need of foundation repair services, contact PermaDry Waterproofing today. They offer a wide range of foundation repair services and their team of experienced professionals can help ensure that the job is done correctly and safely.
Identifying Basement Odors And How To Treat Them
One of the most common problems for basement owners related to water damage, moisture, and other organic materials are foul smells and odors. Poor air circulation, high moisture content, urine, organic material, dead animals, and a flooded basement are all the recipes for your basement to become host to various stinks.
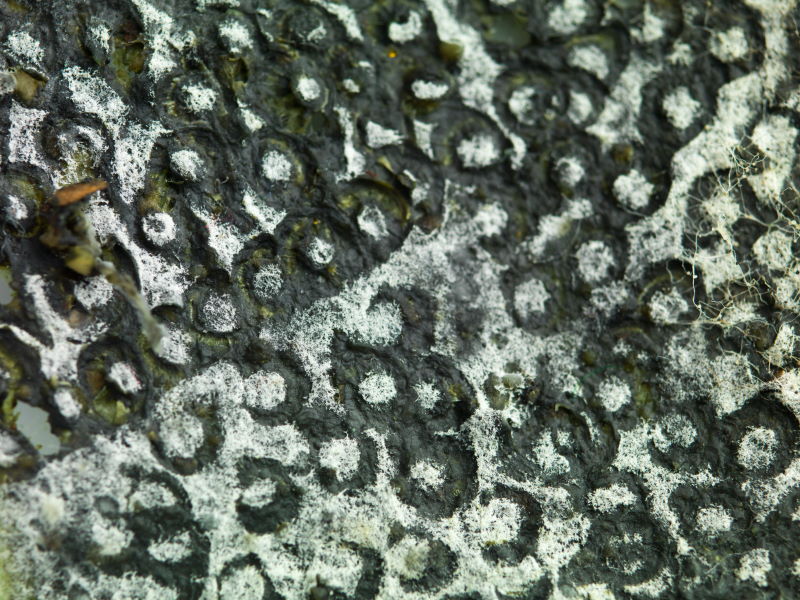
Mold and Mildew Musty
Basements are prone to moisture and water damage, especially when they are not correctly waterproofed. This causes molds and mildews, which have a unique and musty smell to them and could cause health problems if not fixed immediately.
Molds could also form on dead animals such as mice and, when exposed to moisture, could hasten and strengthen the musty smell of decomposition. The more moisture present in your basement, the faster mold and mildew grow and spread.
The best way to prevent molds and mildews is to keep your basement as dry as possible. You could also throw out affected furniture, fabrics, cardboards, or any absorbent material. Ensure that all possible sources of water are adequately sealed, and drains are unclogged. You could also invest in a dehumidifier to pull moisture or water vapor out of the air. If the problem persists, consider hiring the right professionals to fix the issue of moisture and water damage as well as molds and mildews.
Sewer Gas
If you smell the overpowering odor of sewage, it is highly probable that it is sewer gas accumulating in your basement. In large quantities, sewer gas can be toxic and even explosive, especially in confined spaces.
The smell typically originates from sewer lines or septic tanks containing waste materials. Sewer gas contains a mixture of methane, sulfur dioxide, carbon dioxide, and nitrous oxides that could pose health problems to people and pets.
When you smell sewer gas, the most common cause is because of the basement’s floor drain p-trap dried up, allowing the gas to seep up. It could also be from a broken or missing cleanout plug in the floor drain. Another cause could be from cracks or leaks in sewer lines, which is a more serious problem and would require a plumber to fix.
Regularly check if your P-traps are primed with enough water in the curved section to prevent sewer gas from leaking. Locate cleanout plugs and ensure that they are in good condition. If the problem persists, better contact a plumber to help you.
Urine
The pervasive smell of ammonia in animal urine is very distinct and very difficult to remove when it attaches to porous materials like wood, wallboards, fiber, or concrete. It could make clean up complicated when coupled with moisture, which lets bacteria breed. Additionally, the longer urine sits, the harder it is to remove the smell. This also attracts your pets, such as dogs and cats, and pests to return to the affected area.
Regular cleaning using everyday household items, including vinegar, detergent, baking soda, or peroxide, would only work to a minimal extent. DO NOT combine bleach with ammonia as this would produce hazardous fumes that, when inhaled, could lead to health problems or even death.
The best remedy for woods, wallboards, and fibers is to throw them out and replace them. However, if you do not have the budget to buy new ones, you could use enzyme-based products to break down the bacteria in urine and neutralize the stinky odor. This also works for concrete surfaces, which are harder to replace.
If all else fails, you could always call professionals for help.
Dead Animals
One of the worst smells you could encounter in your basement is the stench of decomposition. Combined with high moisture, rotting organic matter would be a good breeding ground for molds and fungi. This is why you also have to ensure that your basement is waterproofed.
There is nothing much left to do but to locate the source and dispose of it. However, if the decaying dead animal such as a rat or bat were inside a crevice or wall, time would be the only solution.
Keeping A Fresh Basement
Now that you know what could cause the smells in the basement, here are tips to keep your home smelling fresh.
- Ventilate your basement properly with exhaust fans and air ducts.
- Waterproof your basement thoroughly. You could do it yourself, or for better results, call professionals for help.
- Repair all leaks and plug any holes in walls that could host any pest.
- Keep it clean so as not to attract unwanted visitors a.k.a rats and other pests.
- Control humidity and lessen moisture.
How To Use Drylok To Prevent Basement Water
Let’s say you have an unfinished basement and you want to turn it into usable livable space, but you have one serious problem. And that problem is this water, more specifically water seepage from the outside coming in and it’s wetting everything. If that sounds like your basement, then you will need a drainage system installed as a primary solution.
If what are dealing with is simply excessive humidity, generally caused by vapor drive, through walls and floor. Well, there is a simple solution to that, and it’s a solution that you can complete in a weekend. This solution is Drylok Masonry Waterproofer. It’s so easy to put on, and again, you can put it on in a weekend. It works on cement block walls, and all types of masonry.
Test For Seepage And Condensation
Before you apply Drylok, though, you need to make a simple test tape. The test tape is a 12 inch by 12 inch piece of aluminum foil taped tightly on all four edges to an interior basement wall. Remove it after several days. When you remove the foil square, check it on the inside for moisture. If you find that you have vaper drive. water on the inside of the foil or on the wall, you have vapor drive. You have water coming through from the outside. Drylok will help mitigate the vaper drive concerns. There are reasonably priced test kits available on Amazon.
If you have water on the outside of the foil, then you have condensation. And by the way, both condensation and seepage can occur at the same time. If you do have condensation, then you may need a dehumidifier in that room. If you find that you have a vapor drive problem, you’ll want to go outside and check for drainage issues that might create this seepage. Check for leaky gutters and downspouts that block drainage pipes first. Check for improper grading that directs groundwater runoff towards your foundation. In the Pacific Northwest the primary consideration is often water pressure on the structure that is unseen. This water pressure comes from seasonal water table ascension due to the geology of the region and cumulative saturation issues. Again, if this is your basement then a drainage professional and drainage system will be required.
Prepare Your Basement Walls
Once you’ve done what you can to identify and prevent the seepage from the outside, and/or had a drainage system installed if needed, it’s time to prepare your basement drainage walls on the inside for Drylok. Prepare the surface to be waterproofed by removing any loose mortar, dust and dirt with a wire brush. A good tip before using a patching product is to wet the area where you’re going to be working, fill any holes and cracks with a fast setting, hydraulic cement. Be sure to seal the floor and wall joints, which are often overlooked as a source for water seepage. With all products, read and follow the manufacturer’s instructions.
The worst enemy to waterproofing product is efflorescence and it appears as a white powdery residue on the surface. efflorescence comes from natural occurring salt that’s already in this masonry and makes it’s way to the surface. We need to get rid of all of it before we do any waterproofing. To get it off, use muriatic acid according to the manufacturer’s instructions. Be sure to follow the warning labels. Since you are using an acid rinse thoroughly and allow it to dry.
Apply The Barrier Thoroughly
Now we are ready to waterproof. To do this, you’ll want to use a good quality synthetic bristle paintbrush. You’ll take the Drylok and apply the brush. It’s not like putting on paint. You need to really work Drylok into the pores of the block. Rather than just brushing on light paint, you’ll want to go back and forth. Get in all the contours and fill them in really well. Drylok works by penetrating the surface pores. It fills them and expands as it dries. By expanding into the pores, it becomes part of the wall to form a tough waterproof barrier. That’s guaranteed to stop water, even under pressure. I don’t want to leave any pinholes open or spread it too thin. That’s all there is to it!
After 24 hours apply a second coat with either a brush or a roller. So you see, there really is no reason that you have to live with a drab wet basement. We did all of this in just one weekend using Drylok Masonry Waterproofer, and you can do the same thing too.
Remember… if not simply vaper drive then you will likely need a drainage system professional to install a more permanent solution.
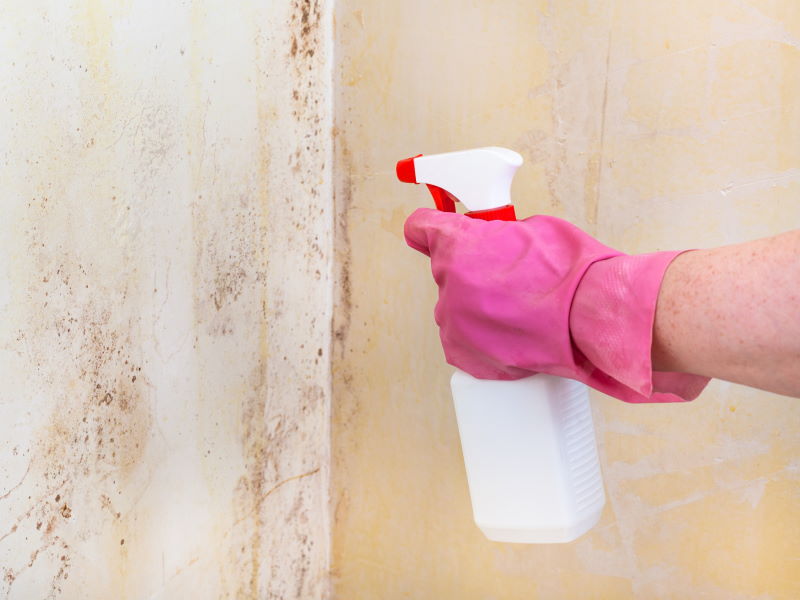
How Dangerous Is Basement Mold
Mold is a common concern for homeowners. Black mold specifically is very concerning. We’ve been hearing more and more about black mold and the negative health effects associated with it. It often shows up where you can’t see it at first. If it’s showing up in building materials and items in your basement, then you can see the mold most of the time. However, some of the areas that you can’t see are hiding an even bigger problems.
Mold Is Bad For You And Your Home
In addition to the indoor air quality concerns, mold is also bad for your home. When mold starts growing on building materials it feeds off of organic materials. Anything that was was once a tree is at risk. Any 2x4s, 2x8s, paper facing on the front and back of drywall, structural beams, structural joists, your sub floor, all of these things are susceptible.
The reason why mold is able to grow in the first place is the elevated relative humidity in and around wood building materials that are exposed over long periods of time. These materials are also susceptible to being weakened by the penetration of that moisture and vapor into the wood.
Mold Can Cause Structural Damage
Many times we’ll see homes that have sagging floor joists or sagging beams. That’s creating uneven an unlevel floors on the main level of the home. If you are experiencing musty smells in your basement, or if you’re experiencing kind of a damp feeling in your basement, or any musty or moldy smell, that could indicate a risk of mold. If your allergies are acting up more than what they have in the past, or even triggering some asthma flares then it’s a good idea to have someone come out and test your air quality. There’s a chance you have mold.
We can test your relative humidity. We can test the contents of your basement, and the building materials in your basement to see how much moisture they are holding. This will allow us to assess the risks that you have. Preventing vapor and groundwater intrusion from your home or crawl space, and dehumidifying your home with a proper basement air system will protect your home from mold and dust.
How To Stop Mold Growing In Your House
Today we’re talking about a house that was built about 20 years ago. behind one wall we had a little bit of growth. We’re not sure what it was. Some black stuff growing on the paper, facing the dry wall. You could actually see just a little bit of it right on the base of the wall. It’s kind of a blackish stuff. Again, we don’t know what that is. It may be mold. It may not be, but we know how to solve it.
Mold Needs Three Things To Grow
Here’s the deal. Anytime you see mold growth in a house, mold needs three things to grow. It needs a temperature, It needs a food source and it needs a water source. Our houses are full of food sources. The more broken down the cellulose is, which is a great food source, the more mold is going to like it and grow on it. The facing that’s paper on your drywall is a great spot to grow mold. You’re going to see more mold growth on the paper of the drywall than you would on a 2×4. More mold growth is going to happen on OSB than plywood. The more broken down the wood, the more the mold likes it. Number two, we need a temperature. Mold likes an elevated temperature. Typically the temperatures that we like or the temperatures mold likes as well. At 70 degrees and above, you’re going to have more mold growth. The hotter it gets, the more active it’s going to be.
While we can’t do much about the food and temperature, water source is the biggest factor we can control as a builder or as a homeowner. Number one, we want to make sure we don’t have any bad water leaks. We want to make sure our windows are not leaking. We want to make sure our houses don’t have roof leaks, or lots of condensation. All those things can lead to mold growth. We didn’t have that issue with this house. What we had here is an elevated humidity level. We’re in this basement waterproofing company space. The walls are fully underground and we’ve had a really wet couple months. Likely the concrete walls and floor are going to be fairly wet.
Bring The Humidity Down
Some of that moisture is migrating into the space and it’s not getting relieved by the HVAC system. I saw a humidity in this room of about 70%. Anytime we get above 60% in our houses, that’s when mold’s going to have be more likely to grow. And the higher we get to 80% or above, it’s really going to be active. Now we put a dehumidifier in the room a couple of weeks ago, it’s been pulling water out of the space and now we’ve been able to get the humidity down to 41%. We’re not going to have any activity at 41%. This situation has been totally taken care of. However, the house has a couple of other areas that are issues that may be contributing towards this mold problem. The next place we need to check is the attic upstairs.
This attic had some problems as well that were exacerbating the issue down in the basement. Number one, air leakiness. When I opened these attic stairs, I noticed right away, there was an uninsulated staircase. It would be as if we left our front door open on our house and expected our HVAC system to catch up. This is a terrible system in so many houses and needs to be insulated. It needs to be weather stripped and air sealed.
An Uninsulated Attic Causes Issues
The next thing I noticed was there were several areas in this attic that were either uninsulated or we can see directly into the house. We’ve got a bunch of air sealing that needs to happen up there. And why does this need to happen? What happens when we’ve got an un air conditioned attic like this with duct work running through? In the summertime, this attic’s going to be 130 degrees. We’ve got air conditioned air inside this duct work at 55 degrees, and there’s going to be some small cracks and holes in the duct work. All duct work has some amount of leakage. When this duck turns on and blows air through it, that air leaks out. It depressurizes the house.
And now the house is sucking air, basically wherever it can. That air is getting sucked right through the staircase. Now, when the air leaks out there, we’re suck in 130 degree air, right through the staircase area. That’s adding to the humidity load for the space. It’s adding to the heat load. It’s terribly inefficient and terribly uncomfortable, and probably is going to add to that high humidity issue. Humidity, is of course was the problem in the basement.
Energy Efficiency Is Key
We’ve made sure that our envelope is as airtight as possible. We’ve conditioned and filtered the air. We’re going to take care of that microbial growth, but we’ve also increased greatly our comfort in this house. And then we’re going to make a big impact on the energy efficiency here, too.
If you’re building new, the takeaway for you is bring those ducks into your condition space. That way you won’t have a lot of these problems to begin with. Also, do the best job of air sealing you can while it’s under construction. Air sealing your house is much harder to do after the fact. If you’re reading this and you’ve got an old house like this, there’s houses like this all over Washington State, you might consider adding separate dehumidification.
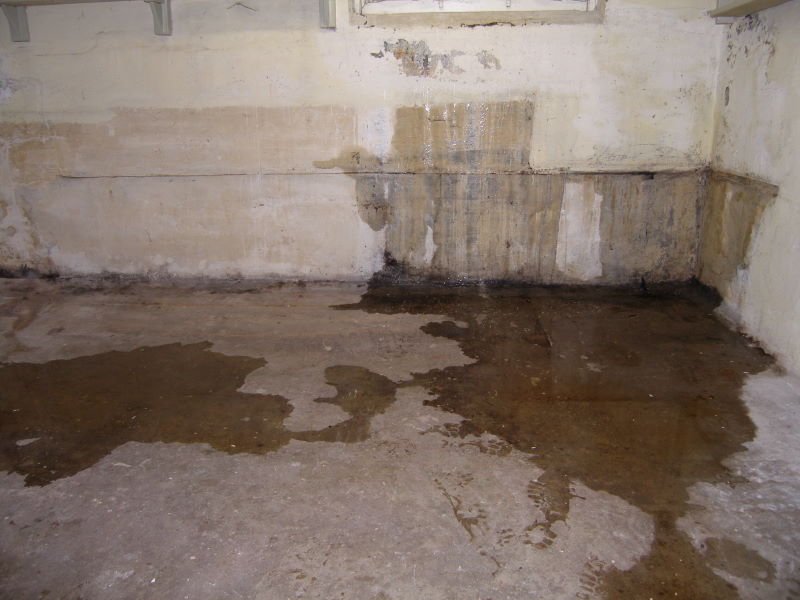
What Causes A Wet Leaky Basement
The Water percolates down through the top soils until it hits a harder soil, which has peaks and valleys, the water will accumulate in a valley. If that level of earth is pitched in any way, it gets into an artery capillary or vein that runs underground. You see the different colors in the soil. The soil at the top would be your top soil. And then you have a sand and a clay layer.
Digging Foundations Disrupt Soil
Whenever a builder builds a house, he creates a hole. Because the earth has been severed and the layers have been disrupted, the water will pour out all to the bottom. The flowing water will then hit that footer at the basement waterproofing Seattle of the foundation. The water seeks its own level. It’s going to work its way all the way around the house and then accumulate and fill like a pool. Even though the home has been backfilled for 30 or 50 or 100 years, the earth around the foundation is just a loose soil. This earth prior to being dug up has been here since the beginning of time.
Because of the reasons described above, rain water will saturate the soil around the foundation of your house. It will just sit against the walls of your foundation. Water has acid. The acid will break down this original tar. That will eventually introduce the water to the concrete of your foundation. That block is porus. The water is going to start to penetrate inside of the wall. Once the water penetrates through the outer block, it will begin to accumulate within and fill up the hallow core. As the inside of the blocks fill, the water will move from block to block, all the way around the house. That process will eventually create hydrostatic pressure inside of the walls.
Concrete Becomes Soft
Concrete block, and cinder block corrodes over time and becomes soft. How does that happen? Well to make cement, you take a limestone. By cooking and crushing up the limestone, you’re left with a powder or limestone dust. This limestone dust was sold to farmers back in the day because Lyme is a natural neutralizer of acid. These farmers would often apply the lime dust on the soil. The dust would neutralize the acid and cause crops to grow better. When you make cement, you take one part of powder and three parts of common sand.
If you mix that together you get cement, but a very weak cement. However, if you take a third of a third of the lime dust, and add that to the mixture, you’ll get a much stronger mixture that can stand the test of time. The problem lies with the acid in rain water. This acid, over many years, will break down the lime dust and weaken your cement walls. When the lime in cement begins to leak out, that creates the white powder that you often see on older cement walls.
Unfortunately, The more that lime dust leaches out, the weaker the original mixtures becomes. The cement structure becomes soft as it corrodes over the years. Small pinholes begin to form and water begins to make its way inside the home. Eventually the bottom of the walls can become soft too which will cause structural damage to the house.

Three Methods To Effectively Fix Bowed Wall
You could usually spot signs of foundation wall bowing quickly, even in their onset, if you periodically inspect your basement. The most common indications of bowed walls are cracks and water leaks caused by unstable soil, water buildup, or tree roots pushing from the outside.
Most of the time, developing cracks between basement walls made of concrete blocks follow the joints creating a “stair-step crack” or a horizontal crack near the midpoint. Meanwhile, the cracks often follow a diagonal path for poured concrete walls starting from the corners going into the center. In any case, when combined with lateral loads from the outside, inward tilting and bowed walls frequently follow after such cracks appear.
Such issues usually take a slow and gradual process that could worsen over time if left alone. They could quickly bring down your house’s real estate value and create safety hazards, which are expensive and time-consuming to resolve. Cracks are also one of the leading causes of basement water damage, and having a bowed foundation wall could pose a severe problem.
This article looks into three common ways on how to repair bowed walls.
Methods For Repairing Bowed Walls
To determine the method best for repairing bowed walls depends on how extensive the wall is bowing. More advanced damages would require more expensive and time-consuming solutions. To avoid this issue, it means that you need to take action as early as possible.
However, for your best interest, you need to know that repairing bowed walls does not always mean it goes back to its original position. The purpose of such repairs is to secure and stabilize the wall avoiding further damage.
Based on the extent of the problem, there are three widely used methods for repairing bowed basement walls: carbon fiber straps and staples, wall anchors, and helical tiebacks.
Carbon Fiber Straps And Staples
The simplest way of reinforcing bowed walls is to use carbon fiber straps or staples. They are a good choice when the damage is minimal with less than two inches of bowing. This method is also the cheapest and fastest remedy to install, preventing further complications. It also involves no excavation making it less labor-intensive.
When cracks appear along your foundation walls, it is advisable to use straps or staples after filling the voids with either polyurethane or epoxy injection. Made with high tensile strength carbon fibers, these materials help hold your walls together, keeping cracks from progressing.
To achieve the best results for carbon fiber straps, they need to be connected to the basement wall’s foundation and the sill plate above. This distributes the stress on the center of the bowed wall evenly from top to bottom.
Wall Anchors
When the bowing of your basement wall exceeds two inches, you have to consider using steel wall anchors to secure it. This method requires more labor and time to install than carbon fiber straps, as you or contractors need to work both inside and outside of the basement.
Installing wall anchors entails a certain amount of excavation of at least 10 feet outside the affected basement wall. This means that there should be enough accessible and usable space to safely and adequately place the steel plates into the ground. You would also need to think about the elements impacted by the digging, such as porches, decks, sidewalks, and other structures.
A steel shaft connects a steel plate or channel attached to the inside of your basement wall and the one buried outside in the ground. Tightening the rod pulls the inside anchor along with the wall towards the outer plate, creating tension and locking it in place.
Contractors usually recommend placing anchors roughly 5 feet from each other along the bowing wall.
Helical Tiebacks
If you have limited space outside your basement to install anchors, you could consider using helical tiebacks as the next best option. This method is used for basement walls with more than two inches of bowing. However, helical tiebacks are the most expensive of the three systems.
Contractors would drill a screw-like steel shaft from the basement wall’s inside at an angle through the earth on the other side. The shaft attaches to large vertical steel channel fastened to the floor and runs upward near the top. This restores the structural ability of the wall without the need to excavate.
Keep in mind that as soon as you spot signs of a bowed wall, you should immediately act and address the issue before it leads to more significant problems. If you see cracks and leaks, consider the possibility that you might be having a bowing wall. You can always consult experienced professionals to identify and help solve the problem, especially when repairing such issues involve using non-household tools and materials.
Get in Touch
(206) 309-5147
Contact Us
Open Hours
7:30am - 5pm Weekdays
Closed Weekends
Our Office
608 SW 12th Street
Renton, WA 98057
Email Us
Email Us